Spiral Staircase Handrail
What has a spiral staircase handrail got to do with boatbuilding?
Well, although this is a nice way of making a handsome
handrail for an indoor staircase,
similar rails with arbitrary curves are needed on bigger boats and
ships.
On the other hand, it might be possible to use a similar method for
making frames to smaller boats instead of steam bent or sawn frames.
This method might be especially useful when replacing frames in confined
spaces. It would be possible to just "insert" a frame from one sheer
without taking all of the boat interior apart.
And boatbuilding epoxy is used here.
Or maybe this has nothing to do with boatbuilding, but so what? ;-)
To the point then. The need for a handrail arose for a cylindrical
spiral staircase.
The local construction rules require a handrail in all kinds of
staircases, even if there is no danger of falling outside the steps.
The family set down the following reguirements for the rail:
- It has to be round in cross section.
- Rather a delicate one than a stout one.
- Choice of material is rather free. It may be stainless pipe, it may
be painted pipe, it may be round wood, it may be whaterver round, wound
with a leather strap.
The phone book yellow pages listed a dozen or so staircase handrail makers.
Calling them yielded two kinds of replies:
- "We only make straight handrails."
- "Well, well, well, we make ANY kinds of rails."
A couple of "any kind of rail" makers came on site, tried to measure a bit
of something, and promised to be in touch.
Which they never did, of course.
Measuring a spiral staircase to build a handrail by the measurements
is no trivial matter.
There are a couple of manufacturers of prefabricated spiral staircases
in the country. At least one of them would make the handrail out of
wood to customers' specifications. The diameter of a round rail
would be 50 mm / 2", which is on the stout side.
The price of a wooden rail like this was told to be € 176.- ($ 210.-)
per stair step, without fastenings, at the factory.
In a two flight staircase, 33 steps altogether, that would have
added up to € 5800.- ($ 6960.-) (in 2005).
A LUNATIC PRICE!
It seems that the mansion restaurations and glass palaces of the
nonsense it-millionaires have skyrocketed the prices of even slightly
out-of-the-ordinary house construction. If the buyer doesn't
understand anything, the seller can charge whatever pleases him.
Well, let's get this over and done with, quickly and cheaply.
 |
The basic idea is to make the rail out of black
polyetene pressure water pipe, stiffen it with a bunch of wooden
battens laminated inside the pipe with epoxy, and cover the pipe
with leather.
The water pipe comes in a coil, so it is curved to start with.
It fits a round staircase tower naturally and with ease. The radius
of the coil is smaller than the radius of the tower, so the pipe
has to be straightened rather than bent.
|
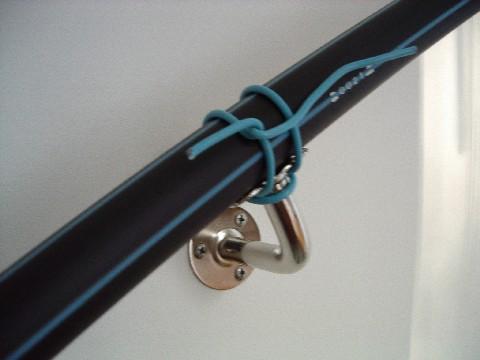 |
The pipe was first tied to the wall fasteners with electric wire.
Using screws at this point is out of the question, since screw
points protruding into the pipe would interfere with the wood
battens to be inserted into the pipe.
|
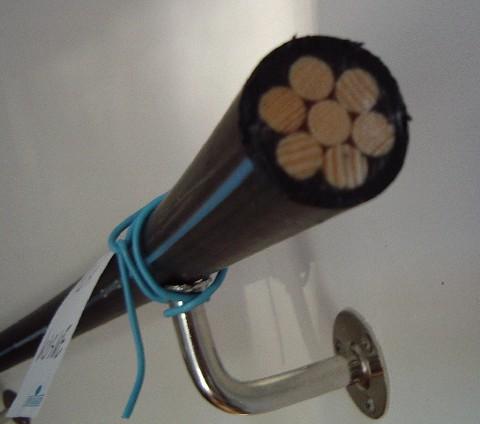 |
Seven round battens of pine, with a 8 mm (5/16") diameter, will be
inserted into the pipe. A bundle of seven fits the pipe snugly, but
it has to be pushed in as a bundle. If pushed one by one, only five
or six battens will slide in.
The outer diameter of the pipe is 32 mm (1 1/4"), the inner diameter
26.2 mm (1 1/32").
|
 |
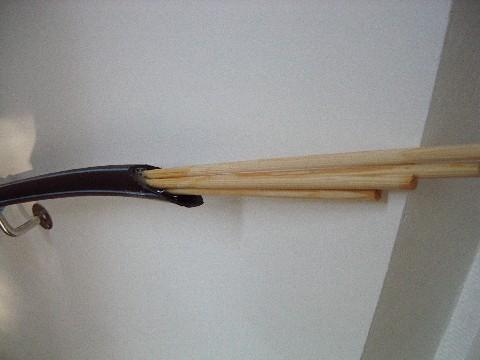
The length of the battens is 2.4 m (8'). One bundle was first inserted
from the lower end of the rail pipe. The pipe was blocked with a wad
of paper hand towels and duct tape. A small air bleeding hole was
left in the tape.
Half a liter of freshly mixed epoxy was poured into the upper end of the
pipe. The epoxy was Gougeon Brothers' West System with a slow hardener
(resin 105, hardener 206).
Although epoxy runs and runs and runs and runs and runs and runs, it is best
to be on the safe side to get the pipe and air pockets between the battens
filled fith epoxy all the way down the pipe.
|
 |
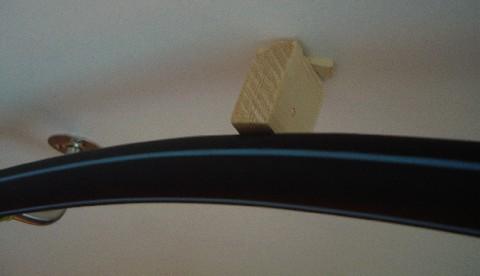
Another bundle of seven battens was inserted from the upper end.
Some epoxy was poured into the bundle as it slid in.
|
 |
The rail is not yet stiff at this moment. Now is the time to
force the ends to their desired locations.
|
Keep on pouring epoxy in small doses into the pipe as long
as the pipe accepts it. It is a good idea to keep an eye
on the air bleed hole at the lower end of the rail.
It would be nice to close the hole before there is a large
pond of epoxy on the floor ;-)
When the pipe is full, let the epoxy harden in peace.
 |
Ends of a handrail must not be left sticking straight out. Instead,
they have to have bends towards the wall or downwards. To prevent
pockets and sleeves from being caught, and to prevent people from
being "speared".
The 32 mm (1 1/4") pipe diameter is handy, because it's a standard
diameter for all kinds of drainage system parts. The end bends to
this handrail will be made of these plastic wash basin drainage pipes.
|
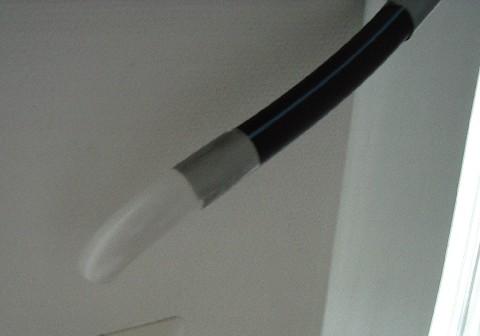 |
Cut a suitable piece of drain pipe, attach it to the rail with a
piece of wood, epoxy, and duct tape until the epoxy is cured.
|
 |
Drain pipes make a nice bend...
|
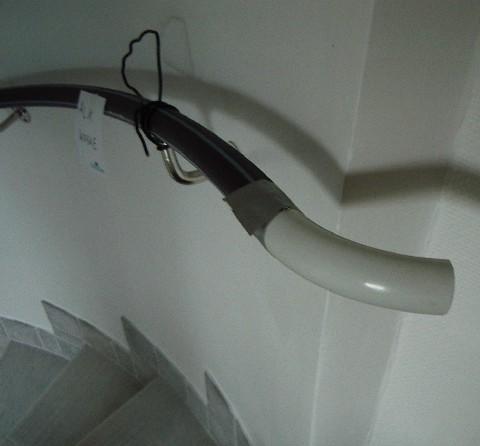 |
...for every end of the rail.
|
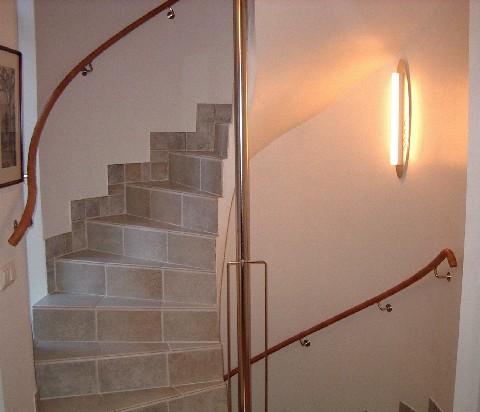 |
The rail complete, covered with leather.
|
The final price tag on all the parts needed for this handrail turned
out to be some 4 % of the factory price for a wooden rail.
Some savings, huh?
Top of the page.
Back to main page.