
Compare these with the resistance curves of the original Little sister dory. The wave making resistance is lower now, so the new 3SD should be slightly lighter to row at speeds above 3 knots or so.
Since I published the plans of the Little sister dory in 2003, I've been thinking about even better use of plywood.
My aim has been producing dory plans, that would produce a good looking dory, that would be as big (in terms of length and displacement) as three sheets of plywood would make possible, and would make as nearly 100 % use of plywood as possible. Remember, I started this hobby with the one sheet design concept Prism, that makes a full 100 % use of a single sheet of plywood.
So here it is now. A new dory design, 3SD, standing simply for "Three Sheet Dory" (or "three standard deviations", meaning that this dory is that far from an average three sheet dory, that seems to be a tiny 15' 6" or so boat ;-).
Be that as it may, this dory reaches about 91.9 % plywood utilisation. When You cut three sheets of plywood according to these plans You are left with so little waste plywood, that You can't even make oar blades out of it.
I call that economical and ecological.
In my opinion the 3SD is good looking. Some might argue, however, that she has too
much of sheer "for modern taste".
That may be so, but the strong sheer can be seen as traditional. In the following line
drawing the profile of the 3SD is compared with the 1884 Portsmouth U.S. Navy shipyard
dory presented by John Gardner in his
"Dory Book".

To tell You the truth, the strong sheer is a consequence of keeping the top of
the boat side completely straight when flat ;-)
And I want to keep the flat side
piece as straight-sided as possible. To avoid unnecessary lofting, cutting and waste
plywood.
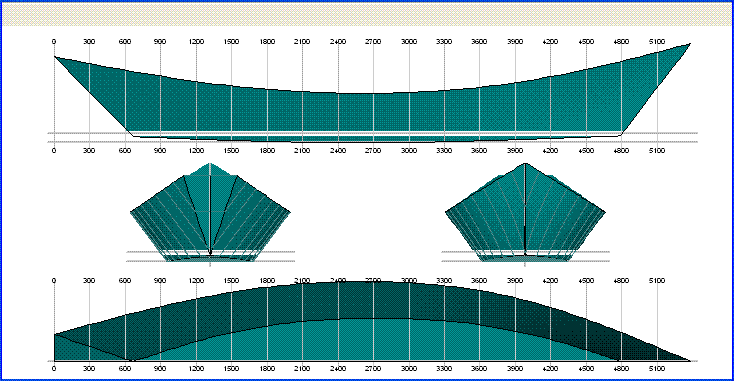
Two ways of building this boat are presented.
The pieces for a butted boat are cut out of three sheets of plywood like this.

The pieces for the scarphed version correspond to the ones for the butted version, except for the provisions for the scarph joints.

Note: The sides are assembled "one side of the plywood out, one side in". In case Your plywood has one good and one bad side, You can have the inside of the boat all good, or the outside of the boat all good, depending on Your taste. I'd probably have the good side in, because that's the side I'd be looking at most of the time. The fish may look at the bad side.
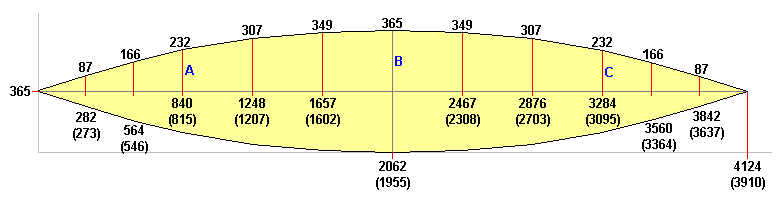
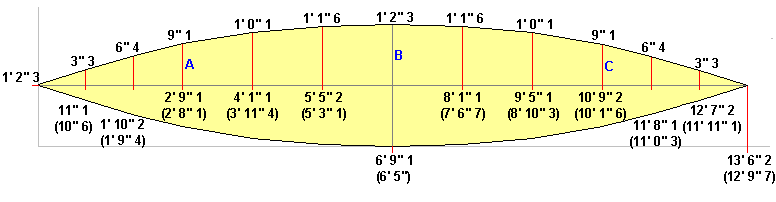
Measurements for the left boat side, inner side up. This would correspond to the red pieces
of the above picture, the pieces connected. The plywood seam lines are indicated with
blue vertical lines on the drawing.
The plain measurements are for the butted version, the
measurements in parentheses for the scarphed version.


Measurements for the boat bottom. The plain measurements are for the butted version, the measurements in parentheses for the scarphed version.
You may have noticed, that the sides and the bottom were both symmetric end to end. Just for simplicity :-)
Measurements for the transom. The plain measurements are for the butted version, the measurements in parentheses for the scarphed version.


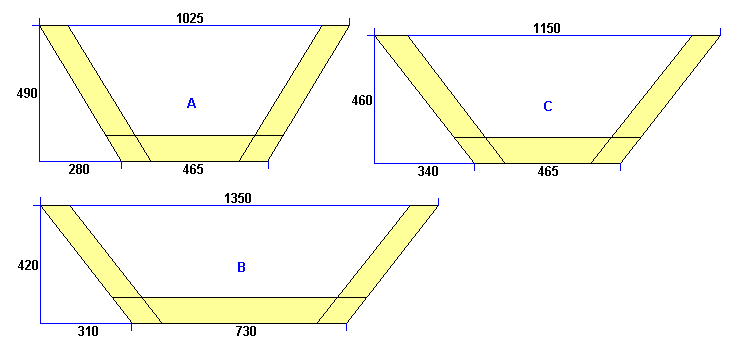
Measurements for frames.

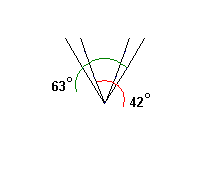
The angle of the stem is 63 degrees at the sheer, tapering to 42 degrees at the bottom.
|
Compare these with the resistance curves of the original Little sister dory. The wave making resistance is lower now, so the new 3SD should be slightly lighter to row at speeds above 3 knots or so. |
Rt (violet curve) = total resistance
Rv (red curve) = viscous resistance (friction)
Rw (blue curve) = wave forming resistance
Rh (pale blue curve) = resistance created by transom stern
Full speed scale = 4.0 m/s = 14.4 km/h = 9.0 mph = 7.8 knots
The building sequence is roughly like this:
At this point do not attach frames A and C permanently. This is just a
temporary arrangement to measure the angle of the sides at the frames to make a
good fit.
Position the frames A and C in such a way, that the front frame A is
just behind the line A (red in the drawing), rear frame C is just ahead of
line C (red in the drawing).

Attach the chamfered frames permanently.
The front frame A in front of line A (red), the rear frame C behind line
C (red).

The 3SD is primarily suitable for one to three people. Using more than three seats makes good sense, however.
For best directional stability in windy conditions it is often best to have the boat:
The more seats You have, the more possible loading combinations.
A suitable oar length for both suggested oarlock positions would be in the range 8' 4" (2.5 m) to 8' 10" (2.7 m).
A quick and dirty prototype was built. Not by myself, but someone wanting to build a "quick-and-easy to build" boat for himself to use for fishing as long as a boat built that way would last.
 |
As can be seen a prototype boat yard does not need to look much like a boat yard :-) |
 |
No saw horses, just a couple of garden chairs, and a couple of short lengths of two by four. Probably a better way of building would be to build the frames first, then attach the sides to the frames and transom, then add the bottom. As described above. |
 |
The plywood hull completed. |
 |
Frames inserted into the complete plywood skin. But as written, this is probably not the best building sequence. |
 |
The hull from another angle. |
"There's no picture of the finished boat" the prototype builder told me.
"I was in a hurry, and had to leave. Building took three long days altogether
for one man."
"The boat gave a nice ride, it was very light to row. The strong head wind I had
during the maiden voyage did blow the boat around a bit when I was alone in the boat.
There was, however, no fear
of capsize."
Well, yes, that's the flip side of light displacement, shallow draft and light rowing.
There is very little lateral resistance to the wind.
Add more weight or add an external keel. Both would add lateral resistance. But at the
expense of shallow draft and light rowing.
Boatbuilding is nothing but compromises ;-)