
Genuine Portuguese fishing boats on the beach of the city Nazare. The relationship with this dinghy should be obvious.
This is another easy start for boatbuilding. A very simple 7'4" x 3'10" dinghy, made out of simple materials, using a simple construction method and just the basic tools. And perhaps even simpler than the original one sheet "Simbo".
How come Portuguese? Portuguese fishing boats typically seem to have flat bottoms, high bows and a lot of rocker. This little boat has them all. That's why :-)
|
Genuine Portuguese fishing boats on the beach of the city Nazare. The relationship with this dinghy should be obvious. |
At 250 lbs displacement, that is, one person, the freeboard is 10". The freeboard is 6" at 560 lbs displacement. The boat displaces about 1100 lbs just before swamping.
Here is the .hul file for those interested.


The one sheet "Simbo" was an attempt to make a very simple boat, with little fuss, using little money and little time.
All of that turned out fine.
There was one constraint: She was a one sheet boat.
There's a lot of good in that:
But also one drawback:
This goes very personal here, I would expect some disagreement, but my mimimums would be something like this:
But as it turns out, all of that can be achieved by adding just a half sheet of plywood! Let's see...
A one and a half sheet dinghy displaces roughly 1100 lbs when loaded all the way up to sheerline. One person plus the boat weigh probably some 250 lbs, two people plus the boat some 450 lbs.
Hmm... How about a sculling seat, a rear seat, and maybe a bow seat for the occasional third person?
Wouldn't this be a dream?

Sorry, but not in a boat this short and light. Dreams are no substitute to physics.
Loaded like above, it will be closer to this.

This "Portuguese Dinghy", like all dinghies about this size, is balanced about the sculling seat, because that's where the center of gravity is, when a single person is using the boat. If You add cargo or people, everything should still be balanced about the same seat.
So to balance the boat with two people in it, both have to sit the same distance from the sculling seat. Which is impossible in a typical seating arrangement.
The most sensible solution would be to use a single lengthwise seat, running the length of the boat, in the middle of the boat. A seat like this makes it possible to sit at any position along the length of the boat. Instead of one, two or three crosswise seats, where only fixed positions are possible. A balance is possible to find with any number and any weight of crew. The rowlock position most comfortable for a single sculler may not, of course, be the optimum in the balanced situation.
But why are there no lengthwise seats around in small boats?
A hundred years ago all boats, also the small ones, were built of solid wood on frames and keel. Boats like this were so heavy, that crew members were not the main component of weight, affecting the center of gravity. They could sit on, say, the sculling seat and the rear seat. The bow of the boat weighing enough to counterweigh.
Not so any more, with light plywood boats.
But people are conservative. "Small dinghies have always had crosswise seats, so they must always have crosswise seats."
Probably small dinghies will always have crosswise seats. It will take a new boat type to change the now obsolete, and actually harmful tradition.
Yes, look at the Jet Skis! And this dinghy, of course.
It is a good idea to read through the original one sheet "Simbo" instructions first, if You haven't done so already. A lot is in common.
The parts of the Dinghy are going to be cut out of plywood roughly like this. As You can see, she could not be cut out of a single sheet. But on the other hand, not much more than the area of a single sheet is used, so weightwise she is very close to a one-sheeter.
The plywood sheet standard in the following pictures is 122 cm x 244 cm = 48" x 96" = 4' x 8'. There are other "standard" plywood sizes, too, but this is probably the most common standard.

The best, if not the only possible material for this dinghy is 1/4" (6.5 mm) marine or exterior grade plywood. 1/2" (12 mm) has been tried, but it is definitively too thick. The sides won't bend without breaking.
But what a waste of plywood! Since she uses up about 1 1/2 sheets, she's a 3/2 sheeter. But hey, that's just another way of saying "two dinghies out of three sheets of ply"!
To minimise waste, build two in a go! The economies are obvious:
Two dinghies can be cut out of three sheets of plywood like this. First cut two sides out of one sheet. There's also enough ply for two transoms.

Cut the remaining two sides and two bottoms out of the remaining two sheets. There's no free play here, so take it accurately. An alternative transom cut spot is also presented here.

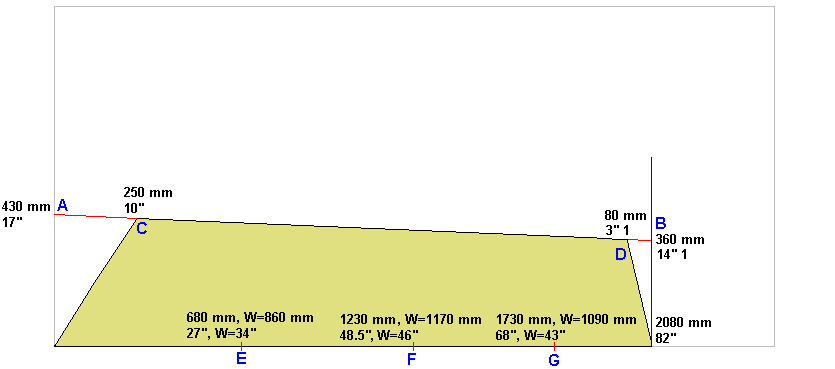
First cut the sides. The crucial measurements for one side are given here. The upper, visible edge of the boat side comes from the factory edge of the ply, so at least that edge will be straight and clean.
Mark points A and B on the ends of the sheet. Draw a straight line from A to B.
Measure and mark point C from point A, and point D from point B. Draw straight lines from C and D to the nearest corners of the plywood.
Then mark points E, F and G on the edge of the ply. The width of the hull will be set at these points using three lengths of board. The widths are marked on the drawing with the W=xxx notation. The board between points E should be 860 mm (34") long, ends cut at 66 degrees, the board between points F should be 1170 mm (46") long, ends cut at 65 degrees and the board between points G should be 1090 mm (43") long, ends cut at 64 degrees. If You don't feel comfortable with cutting the angles, forget about them. Just see that the distance between the sides of the boat at E, F and G are correct.

She can also be built in a 6' x 3'10" version. The shorter version may be preferable if the space to store the complete boat is limited.
At 250 lbs displacement the freeboard of the 6' version is 9". The freeboard is 6" at 450 lbs displacement, and she displaces about 900 lbs just before swamping.
For the 6' version cut the sides like this. Apart from the sides, everything is done just in the same way for boat versions.
And here are the measurements for the transom. The same for both the 7'4" and the 6' versions.

 |
|
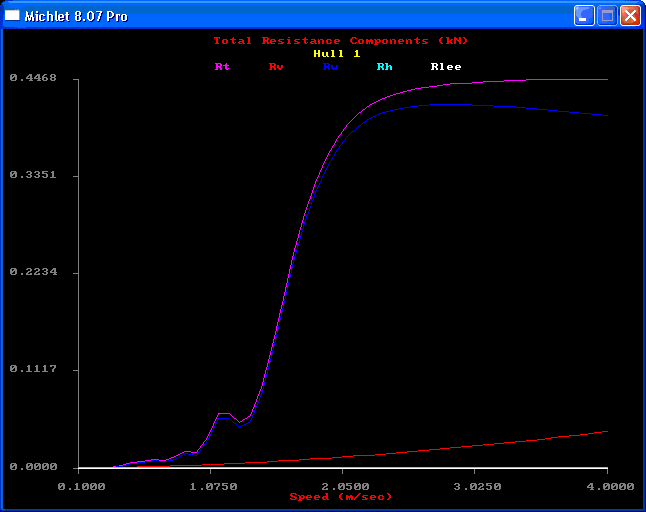
Rt (violet curve) = total resistance
Rv (red curve) = viscous resistance (friction)
Rw (blue curve) = wave forming resistance
Rh (pale blue curve) = resistance created by transom stern
Full speed scale = 4.0 m/s = 14.4 km/h = 9.0 mph = 7.8 knots
 |
|
Rt (violet curve) = total resistance
Rv (red curve) = viscous resistance (friction)
Rw (blue curve) = wave forming resistance
Rh (pale blue curve) = resistance created by transom stern
Full speed scale = 4.0 m/s = 14.4 km/h = 9.0 mph = 7.8 knots
 |
What else is great about winter besides skiing, skating and freezing? Sawing plywood in the middle of snow, of course! Snow or not, doing the first cuts outdoors is a good idea. Handling full sized sheets of plywood indoors is a bad idea. And cleaning sawdust outdoors is not such a must as it would be indoors. |
 |
First cut both side pieces and the transom out of the plywood sheets. Don't worry about the bottom for now. |
 |
Connect the side pieces at bow using glue, small screws and a 54 cm (22") length of square batten of about 25 mm x 25 mm (1" x 1") as bow stem. Make absolutely sure, that sides meet just along the edge of the ply, for the whole length of the edge. This is the foundation of a boat that is not twisted. If You get this one joint right, there's not much possibility to spoil the boat in later phases. The angle between the sides is 90 degrees, so a square batten can be used as a stem "as is". Simple. |
 |
Bend the sides towards the transom, attaching boards E, F and G between the sides, at marked locations, as You proceed. Attach the transom between the sides. Don't use copper wire, don't use wire clips, they are so cumbersome. Use small blocks of wood and screws, like I did on the "Simbo". Or do like I do now. I grow lazier day by day. Now I simply screw the thinnest screws I could find through the side ply, and directly into the edge of the transom ply. This works nicely, when the angle between the plywood pieces is this close to 90 degrees. At this point it makes sense to check, just to make sure, that the distance from the point of the bow is equal to both upper corners of the transom. That is, the boat is symmetrical. |
 |
Lay the sides on top of the plywood that is to become the bottom. Rocking the side structure gently as You proceed, mark the outline of the sides onto the bottom ply. Saw the bottom out of the ply. Turn the side structure upside down. Attach the bottom to the edge of the sides and transom with small screws. |
 |
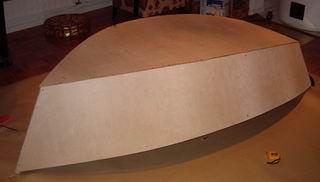
Turn the boat over. Do the standard epoxy and glass tape job on the inside of the boat. |
 |
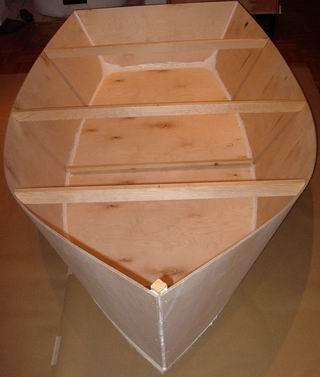
"Small stuff" ready to go in. Breasthook and quarter knees to all corners of the boat, pieces of a seat support frame and gunwales. What are the 64 mm (2 1/2") holes in the breasthook and quarter knees for?
|
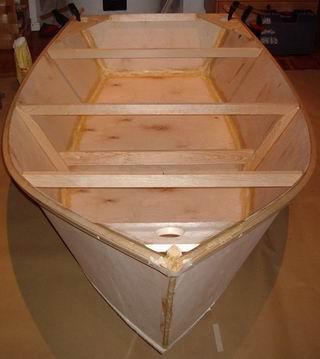 |
Glue and screw the breasthook and quarter knees to all three corners of the boat. My breasthook and quarter knees are of of 145 x 18 mm (6" x 3/4") spruce. Glue and screw seat support frame pieces to the sides of the boat, and a cross member between them. The height of the top of the cross member from the bottom is 14 cm (5.5"). In my boat the side frames are 45 x 21 mm (1 3/8" x 7/8") and the cross member 70 x 12 mm (3" x 1/2"), both of pine. Glue and screw gunwale rails to the outside upper edge of both sides. Square batten of about 21 mm x 21 mm (1" x 1") is fine here. The gunvales curve a lot. Only straight grained, knotless wood will survive the bend. |
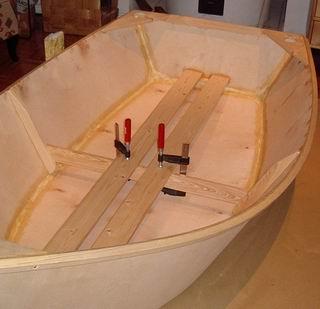 |
This is my implementation of the lengthwise seat. I must admit it looks quite strange. But so does anything I haven't seen before. If this is too radical, normal crosswise seats can be glued in place, of course. The 4 cm (1 1/2") slit between the seat planks is there for a good purpose. It provides comfort for the coccygeal bone. |
 |
A side view. |
 |
The boat complete, but without oarlocks. The oarlocks will be situated 30 cm (12") towards the stern from the line where the sternmost edge of the sculling seat would be, if there was a crosswise sculling seat. Was that unclear enough? |
 |
She has been treated with one coat of water-repellent preservative, one coat of primer and two coats of topcoat paint. Now she will just have to wait for ice to melt. |
 |
She is small enough to be easily roofracked. From this point of view she resembles Portuguese fishing boats with her high bow and rockered bottom. |
 |
The cheapest nylon oarlocks I could find. A piece
of string through two holes in the oar shaft helps
in keeping the oar from falling. |
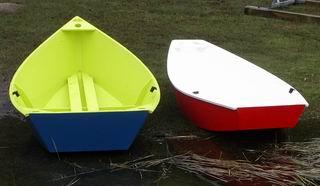 |
Here You can see the difference between a one sheet boat and a one and a half sheet boat. Quite a lot! The red boat is my "Micro Auray". |
 |
The lengthwise seat works very well. I must admit it works better than I expected. This is definitely the way to go. And yes, the slit serves its purpose. Take my word, a one plank seat is a pain compared to this one. The structure of the seat needs some further development. The crosswise support is unnecessary from the seat point of view, but not from boat sides point of view. A crosswise seat would kill two flies there. How to keep the lengthwise seat up and support the boat sides at the same time, but not have extra crosswise (=in the way all the time) beams in the boat? |
 |
Another positive surprise. I deliberately left the skeg out, but was mentally prepared to add one. Many boats of this caliber have a pronounced skeg. I don't like skegs on small boats, especially on dry land. They always seem to get in the way or get broken or hurt Your foot or scratch Your car top or whatever else unpleasant. |
So if the boat goes straight enough without a skeg - better forget about the skeg. And this little boat seems to go straight when sculled actively. On the other hand she turns very lively with a slightest hint.
So I'm happy without a skeg.
 |
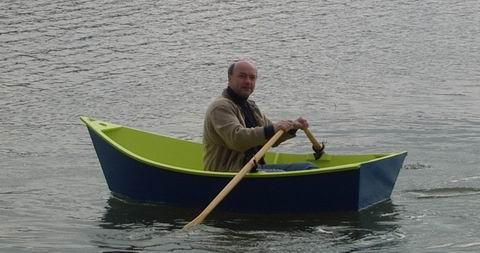
The dinghy may not be a Swan... But from this angle she certainly looks much bigger than she really is. The 6' / 180 cm oars shown here are a bit short for the boat. 7' / 210 cm would be close to optimum. |