
Having done the 3SD I just had to try the 2SD, too ;-)
In this case the plywood utilization turns out to be 90.1 %. Just sawdust and narrow splinters are left over.
At 12 ft (3.6 m) overall length the 2SD may be quite a strange dory. It is definitely too
small to be safe for any real work. And it is quite big for a beach toy.
But it just had to be drawn ;-)

Now compared with the 1884 Portsmouth U.S. Navy shipyard dory presented by John Gardner in his "Dory Book" 2SD does have a strong sheer :-)

But so what? With those sky scraping bow and stern the 2SD definitely makes a difference ;-)
The pieces for the 2SD are cut out of two sheets of plywood like this.

Note: The sides are assembled "one side of the plywood out, one side in". In case Your plywood has one good and one bad side, You can have the inside of the boat all good, or the outside of the boat all good, depending on Your taste. I'd probably have the good side in, because that's the side I'd be looking at most of the time. The fish may look at the bad side.
The side pieces and the bottom pieces have to be joined using glass fiber tape butt seams.
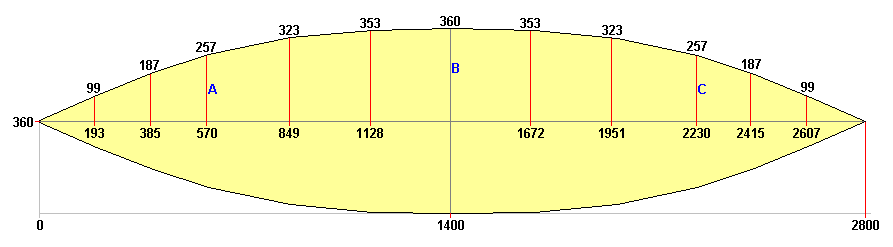
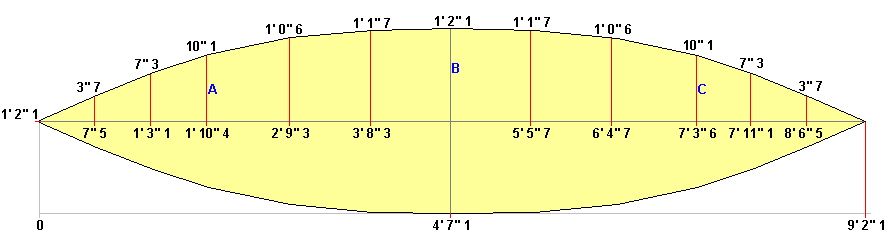
Measurements for the left boat side, inner side up. This would correspond to the red pieces of the above picture, the pieces connected. The plywood seam lines are indicated with blue vertical lines on the drawing.


Measurements for the boat bottom.
Measurements for the transom.


Measurements for frames.


The angle of the stem is 81 degrees at the sheer, tapering to 59 degrees at the bottom.

|
|
Rt (violet curve) = total resistance
Rv (red curve) = viscous resistance (friction)
Rw (blue curve) = wave forming resistance
Rh (pale blue curve) = resistance created by transom stern
Full speed scale = 4.0 m/s = 14.4 km/h = 9.0 mph = 7.8 knots
The building sequence is roughly like this:
At this point do not attach frames A and C permanently. This is just a
temporary arrangement to measure the angle of the sides at the frames to make a
good fit.
Position the frames A and C in such a way, that the front frame A is
just behind the line A (red in the drawing), rear frame C is just ahead of
line C (red in the drawing).

Attach the chamfered frames permanently.
The front frame A in front of line A (red), the rear frame C behind line
C (red).

The 2SD is primarily suitable for just one person. The location for the rowing seat is just in front of the middle frame B.
Two more seats can be installed, at frames A and C. There's probably no sense in this, but You will do so anyway, so what can I do ;-?

A suitable oar length for both suggested oarlock positions would be in the range 7' 11" (2.4 m) to 8' 4" (2.5 m) for the middle seat. And in the range 7' 5" (2.2 m) to 7' 10" (2.4 m) for the front seat. It is to be expected, however, that rowing from the front seat is going to be somewhat cumbersome, due to the side height at the seat position.