A 10 1/2 ft Skiff

This is a very nice but simple 10'6" x 3'10"
skiff, made out of
two sheets of 1/4" plywood. This skiff is heavily based on my
"Portuquese Style Dinghy".
I myself, and several others who have built the dinghy have been satisfied
with her, so why not make a slightly larger version?
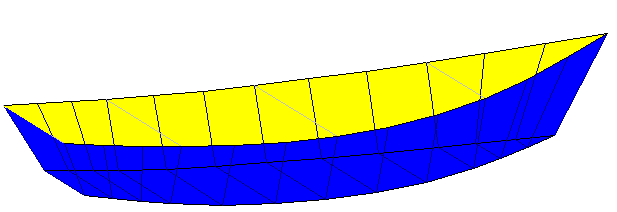
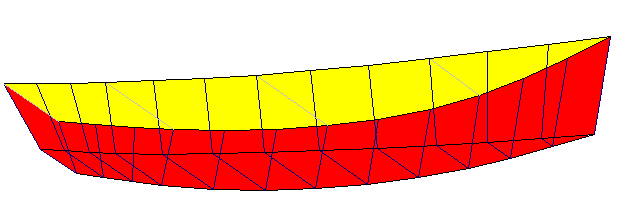
This skiff can be built with "modern" looks, with a slanting bow, like the
drawing with blue sides above. Or "traditional", more sharpie-like looks,
with a plumb bow, like the drawing with red sides below.
Or anything between :-)
This skiff displaces about 1650 lbs just before flooding, she's at
her best with loads between 250 to 400 lbs, that is, one or two adults.
At 250 lbs her freeboard is 12", at 400 lbs 10". Her freeboard falls to 6"
at 900 lbs displacement. What's that? Four adults? She could carry more
than she has space for.
Here is the .hul file for the "modern",
and here the "traditional" version, for those
interested.
It is a good idea to read through
the original "Portuquese Style Dinghy"
instructions first, if You haven't done so already.
Almost everything, except the mesurements, are in common. Some of this text,
too ;-)
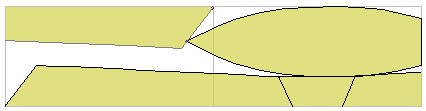
The pieces of the "modern" skiff come out of two sheets of plywood like this.
Yes, three butt seams are unavoidable. But isn't it time to learn how to
make a glass-tape butt seam? Learn it
here.
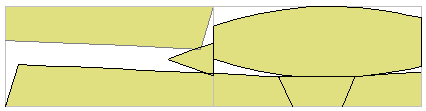
The "traditional" version requires shifting the plywoods a little to ge the
bottom pieces in line. There will probably be small dents at the edge of the
bottom piece, but they are easy to fill in with a small bit of plywood and epoxy,
and they will be left under the fiberglass tape eventually.
A fiberglass tape reinforced butt seam between two sheets of plywood
goes like this.
 |
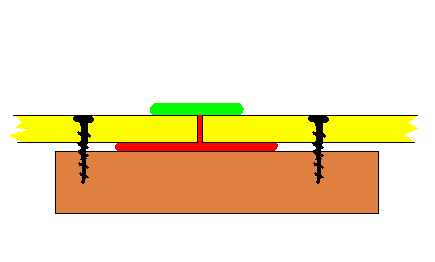
Start with a piece of board the length of the seam, 15-20 cm / 6" to 8" wide,
and a couple of cm / 1/2" to 1" thick (brown).
Cover the board with a sheet of plastic, to prevent epoxy from sticking
to the board.
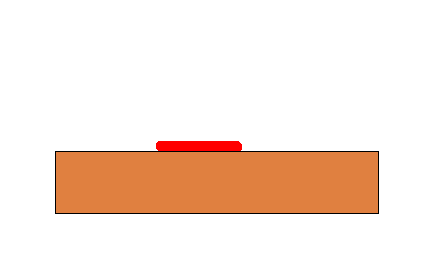
Soak a strip of fiberglass tape, the length of the seam, in slightly thickened
epoxy and lay it on the board and sheet of plastic (red).
|
 |
Wet the edges of the plywood sheet with unthickened epoxy, over the width
of the fiberglass tape.
Lay the plywood sheets on top of the soaked fiberglass tape, edge against edge.
Support the sheets (a couple of bits of similar boards under the sheets) so
that they sit level. Immobilise the sheets by screwing through the sheets into
the board, outside the fiberglass strip.
|
 |
Soak another strip of fiberglass tape, the length of the seam, in slightly thickened
epoxy and lay it on the plywood sheet seam (green).
|
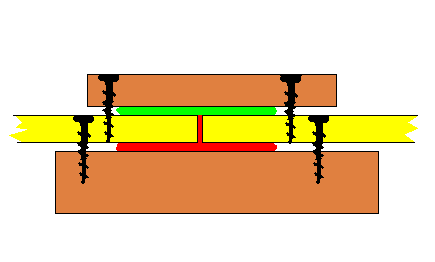 |
Lay a sheet of plastic on top of the wet fiberglass tape.
Screw another board on top of all this (brown), to press the fiberglass
plywood sandwich together. Let the epoxy harden at least until the next day.
Then unscrew all screws and remove the boards and sheets of plastic.
Fill in the screw holes with thickened epoxy putty.
|
The pressure between the boards flattens the fiberglass tape and epoxy
neatly against the plywood. The seam probably won't need any filling.
One strip of fiberglass is enough to join plywood up to 6.5 mm / 1/4"
thick. For 9 mm / 3/8" plywood use two strips of tape on the outside.
And for 12 mm / 1/2" use two strips on the inside, three on the outside.
This boat would be made of 6.5 mm / 1/4" plywood, the thicker ones
are mentioned here just for the reference
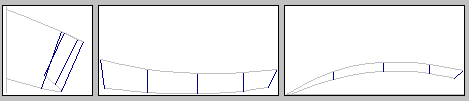
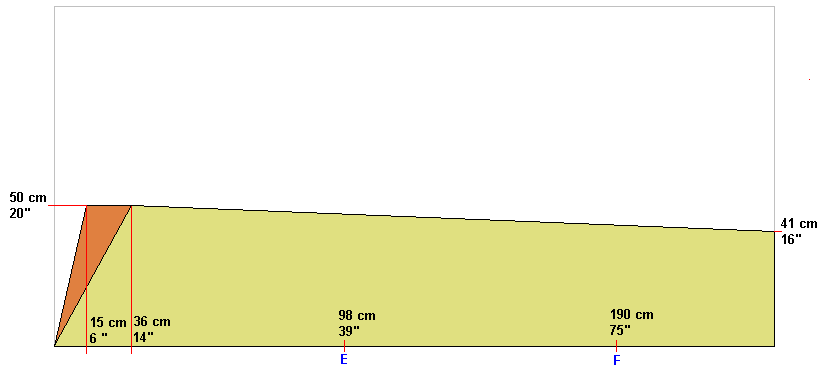
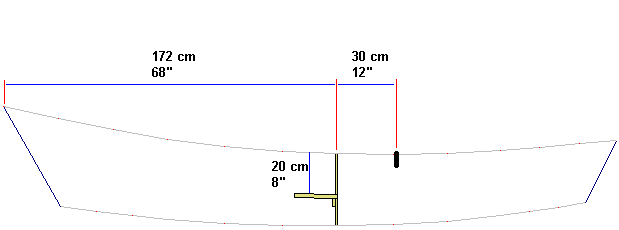
First cut the sides. The crucial measurements for the front part of
one side are given here. The upper, visible edge of the boat side comes
from the factory edge of the ply, so at least that edge will be straight
and clean.
The plywood sheet standard in the following pictures is 122 cm x 244 cm =
48" x 96" = 4' x 8'. There are other "standard" plywood sizes, too, but this is probably
the most common standard.
Cut the bow at 36 cm / 14" for the "modern" look, or at 15 cm / 6" for the
"traditional" look. Or anywhere between for a look "between".
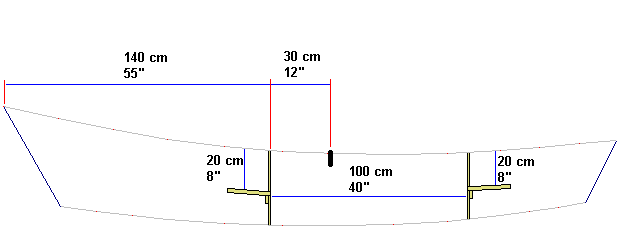
Measurements for the rear part of the sides. Measurements for the transom are not needed,
the left over part from between the side parts makes the transom "as is" (the bright yellow
piece).
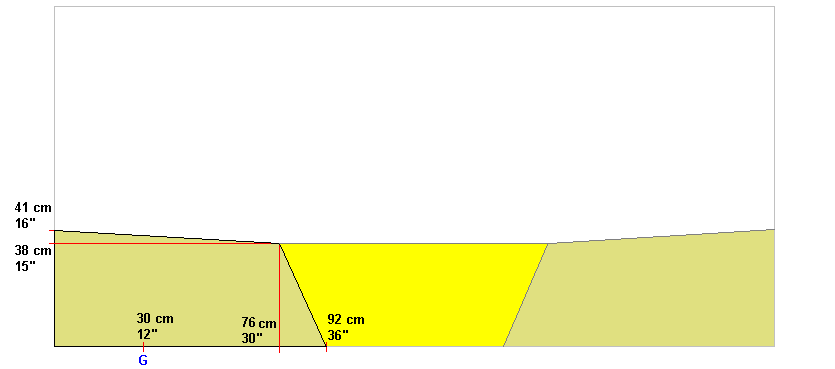
Then mark points E, F and G on the edge of the ply. The width of
the hull will be set at these points using three lengths of board.
The board between points E should be 840 mm (33") long, ends cut at 68 degrees for the "modern"
version, 71 degrees for the "traditional".
The board between points F should be 1170 mm (46") long, ends cut at 66 degrees (both versions).
The board between points G should be 1090 mm (43") long, ends cut at 64 degrees (both versions).
If You don't feel comfortable with cutting the angles, forget about them.
Just see that the distance between the sides of the boat at E, F and G are
correct.
From here on, just follow the building instructions on the
"Portuquese Style Dinghy" pages.
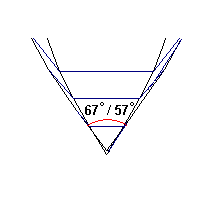 |
Except that the bow stem angle in this case is 67 degrees for the "modern" version, 57 degrees
for the "traditional", so some
planing is required.
|
A lenghtwise seat would be quite proper, but traditional ones may also be
used. I can think of two sensible traditional seat arrangements.
First one, just a single rowing seat at the optimum position for a single person
on board.
A rear and front seat could be added, for three people on board. But I won't,
because the temptation to seat two people in a configuration only suitable for one or
three would be too big. With two on board she would drag her transom, would be hard to
row, and You'd think it's the boat's fault.
Second, two seats, optimized for two people. This configuration just about works
for a single person on the front seat, being slightly bow-heavy, however.
Top of the page.
Back to main page.
A flat bottomed boat? Can that be any good?
Howard Chapelle, in his book "Boatbuilding", states on flat bottomed boats:
In sharp-bowed craft the line of the bottom, viewed in profile, should
conform to a general rule. The heel of the stem should either touch the
water or be just clear of it. From this point the line of bottom, or
chine, should run straight and sloping downwards for about one third of
the water-line length of the boat; from there it should go into a
reasonably gentle curve through the middle third, and then should
again become straight, or very nearly so, and run upward to the stern.
I interpret this as "as far as wave-making resistance is concerned, it
does not matter so much what the shape of the hull is,
as long as the underwater volume
distribution along the hull length is optimal".
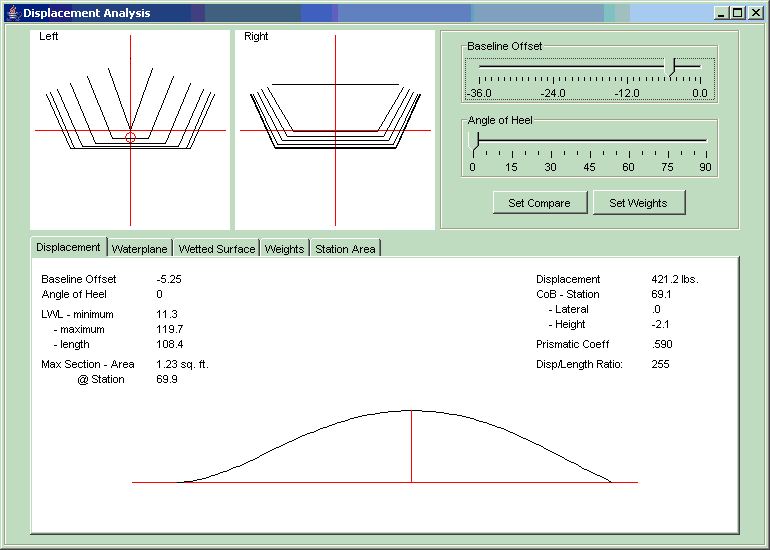
The volume distribution of a boat hull is usually described by a so
called "curve of areas". A curve showing the areas of cross sections
of the boat hull, taken at every spot along the hull length.
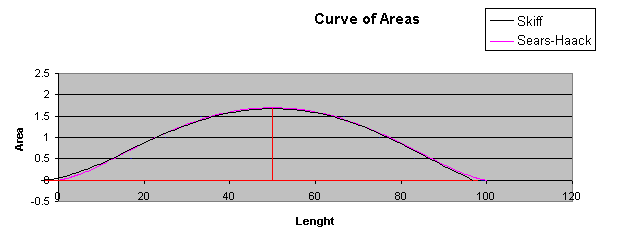
Having taken Chapelle's advice on the bottom curvature, the
curve of areas for this skiff turned to look like this at 420 lbs
displacement. Take a note of the prismatic coefficient 0.590.
What would an optimum curve of areas look like? One possible answer
is given by the so called "Sears-Haack body", developed in 1947 while
analyzing fuselage shapes for supersonic jet fighters. Given
some theoretical constraints, this body shape gives the
lowest wave drag of all body shapes.
The shape of the volume distribution curve (or curve of areas, if You
like) of a "Sears-Haack body" is given by:
x=((L)/2)*(1+cos(alpha))
S=((4*V)/pi/(L))*(sin(alpha)-(sin(3*alpha))/3)
where:
alpha runs from 0 to 180 degrees
x is the position along the hull waterline
S is the cross sectional area
L is the waterline length
V is the volume of the underwater hull (displacement)
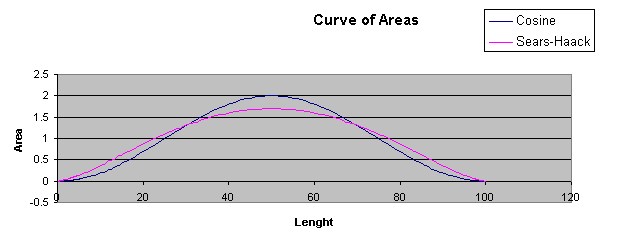
Another possible answer, given by some sources, is the cosine curve.
It seems, however, that the midsection of a cosine curve is fuller
than usually considered optimum. The prismatic coefficient of
a body, whose volume is distributed cosine-like, is 0.5.
In this case
S=(V/L)(1-cos(((x)*360)/(L)))
Whether or not the "Sears-Haack body" is the optimum boat hull
underwater shape, I don't know. This skiff conforms pretty closely
to the volume distribution of that shape, however.
The prismatic coefficient of a "Sears-Haack body" is
0.589, by the way. What was it for this skiff, again?
Moral of the story?
Even a very simple boat hull may conform
perfectly to a fancy equation.
Or, putting it another way,
a perfect boat (from the point of theoretical wave drag in this case)
does not need to be so fancy.
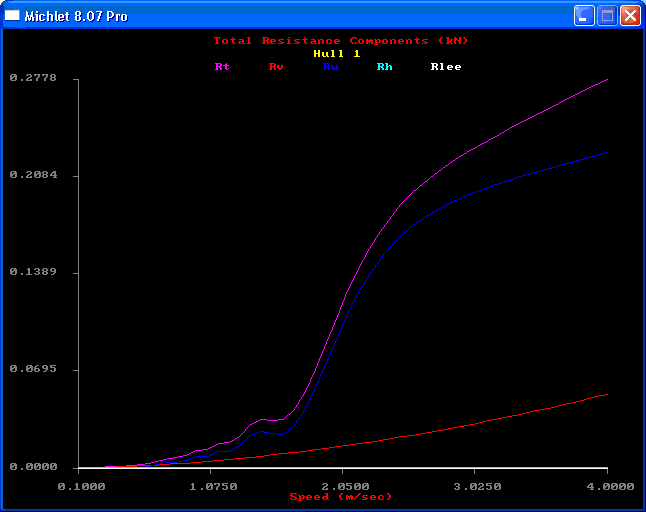
Resistance curves at 120 kg / 265 lbs total displacement
Rt (violet curve) = total resistance
Rv (red curve) = viscous resistance (friction)
Rw (blue curve) = wave forming resistance
Rh (pale blue curve) = resistance created by transom stern
Full speed scale = 4.0 m/s = 14.4 km/h = 9.0 mph = 7.8 knots
Top of the page.
Back to main page.